-1.png?width=100&height=53&name=HopeGives%20-%20Full%20Color%20Horizontal%20(3)-1.png)
Step 1: Start the Connection
Once you're in your HopeGives account, click the PayPal link under Your Organizations > Select the Organization > Select the Payments tab > Click Connect PayPal

What to do:
-
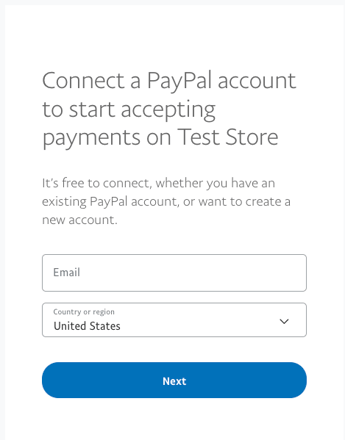
Enter the email address you'd like to associate with your PayPal account.
-
Select your country or region (United States, if applicable).
-
Click Next.
This will either take you to sign in to an existing PayPal account or allow you to create a new one.
If you're creating a new account, continue with the following steps.
Step 2: Create a Business Account
You’ll be prompted to enter the account details:

What to do:
-
Enter the first and last name of the account administrator.
-
Enter the email address you'd like to use for this PayPal account (should not be tied to an existing personal account).
-
Create a secure password.
-
Add your mobile phone number for verification.
Click Agree and Create Account to continue.
Step 3: Choose Your Business Type
You’ll now select the appropriate business structure:

What to do:
-
Select LLC, corporation, partnership, or government if you are a registered entity.
-
Or Select Nonprofit Organization as your business type if this is applicable.
This signals to PayPal that you are operating on behalf of an official organization.
Click Next to proceed.
Step 4: Provide Your Organization's Basic Details
You’ll now be asked to provide the basic information about your organization:

What to do:
-
Enter your Legal Business Name (e.g., BusinessXYZ).
-
Provide the EIN (Employer Identification Number) for your organization.
-
Add the Business Address (must be a physical location; no PO boxes).
-
Enter your City, State, ZIP code, and Business Phone Number.
Click Next once all fields are completed to move forward.
Step 5: Business Overview Details

What to do:
-
For Business Industry, choose something closest to your mission (e.g., Charitable and Social Service Organizations, or select Miscellaneous General Merchandise if unsure).
-
Enter your Date Established.
-
Confirm United States as the country.
-
Estimate your Total Monthly Donations (you can select $0 - $10,000 if unsure).
-
Select US Dollar as your primary currency.
Step 5: Continued..

What to do:
-
When asked if you sell on a business website, select Yes.
-
Enter your business website or https://www.hopegives.com
Under Info for your customers:
-
Enter your Public Business Name (or select to use your legal business name).
-
Add a Customer Service Email (or use your account email).
-
Provide a Customer Service Phone Number (or use your business phone).
Click Next to proceed.
Step 6: Confirm Administrator Role and Identity

What to do:
-
Confirm your role at the organization by selecting one of the options (e.g., you own at least 25 percent of the business or make high-level decisions).
-
Enter the administrator’s date of birth.
-
Provide the administrator’s home address — this must be a physical address, not a PO box.
This step helps PayPal verify the identity of the person managing the account.
Click Next to proceed.
Step 7: Add Beneficial Owners
Some organizations will be required to disclose their beneficial owners before submitting the application:

What to do:
-
Ensure that at least one person who owns 25 percent or more of the business is added.
-
Also include one person who makes high-level decisions (this can be the same person).
-
Review the listed owner information and click Add a beneficial owner if anyone else needs to be added.
Once you've confirmed the information is accurate, click Agree and Submit.
Final Step: Submit and Verify
You're almost done!
What to do:
-
Review all submitted information carefully.
-
Click Submit to complete your application.
-
Check your email and complete any verification steps PayPal sends.
Once your PayPal Business account is approved, your HopeGives organization campaigns can begin receiving donations. 🎉
Here's the link to get back to PayPal.